Wednesday, June 30, 2010

What A Tart!


In T.J. Maxx the other day, I saw a Calphalon tart pan for $7.99. The tart pans I own are the  flexible, irritatingly thin pans of yesteryear. This one is sturdy, nonstick, and devastatingly beautiful (yes, gleaming and shiny and beautiful.) I wanted--no needed--- it. I bought it.
So I needed a tart worthy of such a pan. Enter Epicurious.com, my go-to recipe bank. Up comes a Lime Tart with Blackberries and Blueberries. I had a bag of lemons. I had the fruit. I got to work.

The first crust I made was a disaster. The oven at the beach house is hot and fast (sounds like one of those girls your mommas warned you about.) The first crust came out a little crispy, which is a euphemism for burnt, burnt, burnt. The second crust was parfait.

The lemon curd needed a little coddling, as I imagine curds do. I whisked and whisked and whisked my little heart out, and it thickened not. I heard curd can be made quite effectively in the microwave (gasp!) so I gave it a try. It thickened in a New York minute. I wish all of you thick curd, but if it doesn't work, nuke it in 25 second intervals, whisking after each one.

The finished product, y'all, was AWE-SOME. Try it, now.


Lemon Blackberry Tart with Shortbread Crust
Serves 8-10

Adapted from Bon Appetit

Lemon Curd

3 large eggs
3 large egg yolks
1 cup sugar
3/4 cup fresh lemon juice
6 tablespoons (3/4 stick) unsalted butter, cut into 6 pieces

Fruit Topping
1 pint fresh blackberries
½ pint fresh blueberries

Shortbread Crust
1 ½ sticks butter, room temperature
1/3 cup sugar
1 large egg yolk
Scant 2 cups all-purpose flour
1 large pinch of salt

For lemon curd:
Set fine metal strainer over medium bowl and set aside. Whisk eggs, egg yolks, and sugar in another medium bowl (glass or metal). Whisk in lemon juice. Set bowl over large saucepan of gently simmering water (do not allow bottom of bowl to touch water). Whisk constantly until curd thickens, about 12 minutes. If curd isn't thickening, turn up the heat on the water. When thick, immediately pour curd through prepared strainer set over bowl. Add butter to warm strained curd; whisk until blended and smooth. Press plastic wrap directly onto surface of curd, covering completely. Refrigerate until cold.
For crust:
Using electric mixer, beat butter and sugar in medium bowl until well blended, 1 to 2 minutes. Add egg yolk; beat to blend. Add flour and salt and mix on low speed until mixture resembles large peas. Using hands, knead in bowl just until dough comes together.
Transfer dough to 10-inch-diameter tart pan with removable bottom. Press dough evenly up sides and onto bottom of pan. Chill 20 minutes.
Preheat oven to 325 degrees F. Bake until golden brown, about 28 minutes. Cool completely in pan on rack.
For topping:
Remove sides from tart pan and place crust on plate. Spread lime curd evenly in baked crust. Arrange blackberries in a circle around the edge of the crust. Mound blueberries in center of tart. Serve immediately.

Saturday, June 26, 2010

Summer Sauté


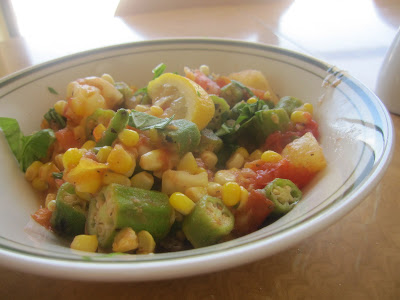
I’m always looking for that perfect summer side dish: the one that goes with almost every meal and takes very little effort to prepare. This summer, I’ve found it. It’s easy, delicious, and showcases some of summer’s best and freshest ingredients. Some may wrinkle their noses at first, but try it once and you’ll be hooked for good.

The following recipe is so simple; it takes a handful of inexpensive ingredients. Of the utmost importance is the freshness of the ingredients. If at all possible, make sure your corn, tomatoes, and okra are field-fresh and ripe. To test the freshness of corn, peel back a little of the husk and dig your fingernail into a kernel. It should pop and ooze a milky liquid if it’s fresh. Tomatoes should be bright red (on the vine, not hothouse) with few blemishes or soft spots. Okra should be bright green and plump. Select the smallest pods from the batch.

The best thing about this recipe is that it accompanies everything, from sausages to steaks, chicken to lamb. I’ve been known to just eat a bowl of it for dinner, it’s that delicious. You could add minced scallions and chopped jalapenos to the first sauté step, but I prefer it without. Try it next weekend for a 4th of July cookout!


Corn, Okra and Tomato Sauté
Serves 6


1 large green bell pepper, coarsely chopped (optional)
3 tablespoons unsalted butter
1 tablespoon olive oil
1 pound tomatoes, coarsely chopped (don’t worry about peeling them)
3 cups corn (from 5 to 6 ears)
1/2 pound small fresh okra, washed and cut into bite-sized pieces
a squeeze of lemon juice
salt and pepper


Cook bell pepper in oil and butter in a large heavy skillet over medium heat, stirring occasionally, 7 to 9 minutes. Stir in tomatoes and cook, stirring occasionally, until broken down into a sauce, about 15 minutes. Add corn and okra and cook, stirring occasionally, until just tender, about 15 minutes. Season with lemon juice, and lots of freshly ground salt and pepper.

Moonlight on the Gulf of Mexico 6.26.2010

Friday, May 14, 2010

Grocery Store Detour

           I rarely have weekend nights home alone. My husband and I have a long-standing rivalry in Texas Hold-Em, and Friday and Saturday nights are spent either out with friends or see-sawing back and forth for the Championship. This Friday night (tonight) was a rare night alone. I craved ice cream, so I went to the store. I am probably one of the few people who venture to the store at 8:30 pm for some sweet treats only to return with a prickly vegetable and some grand notions of homemade mayonnaise.
I have never been a mayo person. I live for mustard: Dijon, ballpark, Creole, spicy brown, whatever. I am a mustard devotee. I recently read one of Molly Wizenberg’s articles in an old Bon Appétit on homemade mayonnaise. It stuck in my head, apparently enough to weasel itself into my ice cream dreams. Best of all, mayo only requires staples: egg yolk, oil, vinegar, lemon juice, and Dijon (yay!). Substitute olive oil and add garlic, and it’s an aioli. Who would have thought?
If I was going to put forth the effort to make mayonnaise, I was going to go all out. When I perused the produce and came across fresh artichokes, I was hell-bent on being French tonight. There was one little setback. I wasn’t prepared for the absolute nuisance of trimming an artichoke. Don’t get me wrong; it’s not actually difficult, just irritatingly messy. Bring a pot of salted water to a boil. To the artichoke, “pull off the tough outer leaves.” Given the twelve or so layers, what constitutes outer was a head-scratcher for me. I mean, how many of the layers are tough? They all looked pretty fibrous to me. Then, cut an inch off the top. Then cut the tip of each leaf off with a pair of scissors. Then the surgery begins. The inside of an artichoke is dark, purple, and prickly, my tender fingers then discovered. Pull out the purple leaves inside, and with a sharp spoon-like instrument (a grapefruit spoon would be ideal) carve out the fuzzy, prickly, “choke.” This was the irritatingly messy part. It’s like blowing a dandelion blossom (or two) all over your kitchen counter. Once the choke is out, you’re ready to roll.


Coat all the cut surfaces with lemon juice to prevent browning. Boil the artichokes in the water for about 30 minutes. Test for readiness by tugging on a leaf; if it comes out easily, they’re ready to eat. Drain and place in a bowl of lemon-juiced water while you make the mayo.

Homemade Mayonnaise                                                                                                                   Makes 1 cup
Adapted from Bon Appétit

1 large egg yolk
The juice from one lemon, freshly squeezed
1 teaspoon white wine vinegar
A dollop of Dijon mustard
1/2 teaspoon salt plus more to taste
3/4 cup canola oil, divided

Combine egg yolk, lemon juice, vinegar, mustard, and 1/2 teaspoon salt in medium bowl. Whisk until blended and bright yellow, about 30 seconds. Using 1/4 teaspoon measure and whisking constantly, add 1/4 cup oil to yolk mixture. Gradually add remaining 1/2 cup oil in very slow thin stream, whisking constantly, until mayonnaise is thick. Cover and chill.


I put on a Sinatra record and got to work. Pull leaf off, dip, scrape the bottom part between teeth. I love artichokes already, so I mistakenly thought I wasn’t in for some kind of epiphany. The mayonnaise was kind of delicious. Actually, it was sublime. Silky, smooth, tangy, not in the same genus, species, or even kingdom as the jarred glop. I may have put a bit too much Dijon in it but I loved the flavor. I think I may have to hide the ingredients because I’m afraid I’ll eat it on everything. The Belgians have it right: French fries with mayo? Oh yeah.


Thursday, March 18, 2010

Why is it called corned beef if it has nothing to do with corn?


This question has always puzzled me. I get that it's brined with coarse salt (referred to as "corns" or grains) but that doesn't seem close enough for me to warrant the name. Then I tell myself to shut up and eat it. 


It is probably no surprise to those who know me that I like tradition. On every St. Patrick's Day, I do corned beef and cabbage, or a "New England Boiled Dinner." I like it this way. I don't like to mess with tradition. That said, I look more forward to the morning after than the corned beef dinner itself. I like corned beef, but I love the much-criticized corned beef hash. Let me make you all aware, this corned beef hash recipe is nothing like the canned dog food slop. It is salty and rich, and positively divine for a weekend breakfast. I begin with the basic “New England Boiled Dinner” recipe. Corned beef braises for several hours, resulting in tender fall-apart meat. Cabbage, potatoes and carrots boil in the broth. Voila, flavorful vegetables!


I like to use red potatoes for some aesthetic reason; I feel that the colors are prettier on the plate. I prefer to cook everything in a Dutch oven rather than a slow cooker; slow cookers tend to boil everything into a mush. With a Dutch oven, the end result is separately cooked meat and vegetables that actually keep their shape. The corned beef hash is a morning-after recipe, as it makes use of the leftover meat. Topping a mass of tangled beef and potatoes with a perfectly poached egg is my idea of a fabulous breakfast. If poaching isn’t your thing, fried eggs would also be perfect with the hash. 


Basic Corned Beef Dinner
Serves 6 

1 corned beef brisket, about 4 pounds (with seasoning packet)
3 cups beef broth
1 medium onion, cut in 6 to 8 wedges
1 clove garlic, minced
2 1/2 to 3 pounds new potatoes, washed and quartered
4 large carrots, halved and cut into 3-inch lengths
1 small head green cabbage, cored and cut into 6 wedges  

Put the corned beef in a 6- to 8-quart Dutch oven; add beef broth, the contents of the seasoning packet, and add water just until beef is covered. Add garlic and onion. Bring to a boil; reduce heat to low, cover, and simmer for 2 hours. Remove the corned beef to a platter, cover with foil, and keep warm. Place a heavy pot on top of foil to weigh down meat for easier slicing. Skim fat from the broth and add the potatoes and carrots to the broth. Bring to a boil; cover, reduce heat to medium-low and cook for 10 minutes. Add cabbage wedges and continue cooking for about 20 minutes or until cabbage and vegetables are tender. Discard the broth, reserving the vegetables. Slice the corned beef and serve with the vegetables and a Guinness.  


Corned Beef Hash
Serves 4 

6-7 slices leftover corned beef, shredded with a fork
2-3 red potatoes, boiled and cut into 1 inch pieces
½ onion, diced
2 tablespoon vegetable oil  
4 eggs, cooked to your liking 

Combine meat, potatoes and onions in a small bowl with one of tablespoon oil. Heat remaining oil in a medium skillet. When oil is hot, pour meat-potato mixture into skillet and flatten with spatula, pressing out moisture and squishing the potatoes. Cook for 4-5 minutes until thoroughly browned and crisp, and then flip. It is easier to flip sections at a time. To serve, top with a fried or poached egg and enjoy!  


Tuesday, February 16, 2010

The Phattest Fat Tuesday Ever


The title is a joke. Really. I just liked the sound of it. In all seriousness, today is Fat Tuesday and it calls for some serious eats. Gumbo is my go-to for any sort of Cajun, New Orleans, or Mardi gras themed celebration. It's easy. It's delicious in a meaty, creeping-heat at the back of your throat kind of way. Any smoked sausage will do, but I prefer Conecuh. It’s a perfect accompaniment to chicken in gumbo. Once the roux turns the color of a penny, you’re ready to add the vegetables. I prefer okra in my gumbo, but if you don’t care for it you can substitute your choice of vegetable or just leave it out altogether. Gumbo isn’t an exact science (some Louisiana cooks might disagree) so use your taste as a guide.


Chicken and Sausage Gumbo
Serves 10

2 tablespoons vegetable oil
1 tablespoon butter 
1/2 pound smoked sausage, (preferably Andouille), sliced into 1/4-inch thick rounds
6 chicken legs
4 cups chicken stock
4 cups water
2 tablespoons flour
1 cup chopped onion
1 cup chopped celery
1 cup chopped green pepper
1 cup okra, sliced into ½-inch rounds
2 cloves garlic, minced
2 bay leaves
1/2 teaspoon dried thyme
2 teaspoons hot pepper sauce
1/4 teaspoon salt
1/8 teaspoon freshly ground black pepper
2 tablespoons chopped fresh parsley
Hot cooked rice
Heat 1 tablespoons of the oil in a heavy Dutch oven over medium-high heat; add chicken legs and cook until browned, about 7 minutes. Remove with slotted spoon and set aside. Add butter and remaining oil and stir flour into pot. Cook over medium heat until roux is browned, about the color of a penny. Add okra, onion, celery, green pepper, and garlic. Cook vegetables until slightly soft, about 5 minutes. Add chicken legs, stock and water. Add bay leaves, thyme, and hot sauce. Bring to boil and cook 1 ½ hours, until chicken is falling off bones. Remove chicken from pot and cool slightly. Remove meat from bones, discarding skin and bones; cut meat into 1/2-inch cubes and put back in pot. Season with salt, pepper, or hot sauce. To serve, mound about 1/3 cup rice in each soup bowl, then ladle about 1 cup gumbo around rice. Garnish with parsley.

Friday, February 12, 2010

Any Excuse to Eat Chocolate


My husband and I don’t generally celebrate Valentine’s Day with any fanfare, but sometimes I like to cook a nice meal for the two of us midway through the month of February. Plus, I can never pass up an excuse to bake dessert. 

For a sweet finish, this pie is crunchy, gooey and chocolaty. When I flipped through the Valentine’s Day issue of Bon Appetit, a gorgeous tart caught me eye. Their version was Milk Chocolate and Caramel with Hazelnuts and Espresso.  I had pecans and dark chocolate. Their version prompted a homemade shortbread tart crust. I had a frozen pie shell. Their garnish was roasted cocoa nibs. I stuck with toasted chopped pecans. 


Needless to say, the only thing that remained the same was the caramel. 


Whether or not you celebrate Valentine’s Day, there’s always time to eat well with your loved ones; the red paper doilies are optional. 

Dark Chocolate Caramel Pie with Pecans
Serves 8

1 pie crust

Caramel:
3/4 cup sugar
1/4 cup water
1/3 cup heavy whipping cream
2 tablespoons (1/4 stick) unsalted butter, cut into 1/2-inch cubes
1 teaspoon apple cider vinegar
1/4 teaspoon sea salt
½ cup pecans, toasted and chopped coarsely (bake at 350 degrees on a baking sheet for approximately 5 minutes, stir once)

Chocolate:
1/3 cup heavy whipping cream
4 ounces dark chocolate chips (I use either Ghirardelli’s Bittersweet or Hershey’s Special Dark)
1 tablespoon unsalted butter
chopped toasted pecans for garnish


Bake pie crust at 350 degrees until lightly browned, about 8 minutes.
For caramel filling, stir sugar and 1/4 cup water in heavy medium saucepan over medium heat until sugar dissolves. Increase heat and boil without stirring until syrup is medium amber, swirling pan instead of stirring, about 8 minutes. Remove pan from heat. Add cream (mixture will bubble up). Place saucepan over medium heat; stir until caramel bits dissolve. Add butter, vinegar, and salt; stir until butter melts. Stir in pecans. Caramel may be bubbly; don’t worry, it will settle in the refrigerator. Pour filling into crust. Chill until cold and set, about 30 minutes.

For chocolate: Bring cream to simmer over medium-high heat, stirring occasionally. Remove from heat and add chocolate and butter; stir until smooth. Spread chocolate mixture over caramel. Sprinkle with chopped pecans. Chill tart until topping is set, about 1 hour. 

Wednesday, January 20, 2010

Biscuits, finally, and one seriously large ham.

I can't tell you how many times I've made biscuits. They've never turned out right. Once I burned them, but I was standing right in front of the oven. That's how biscuit-challenged I am. All I wanted was a traditional Southern buttermilk biscuit. They steam when you slide a knife between the layers. The top and bottoms are just slightly browned. A few buttery flakes fall onto your lap when you take your first bite. They taste like heaven on Earth. I knew a good biscuit only needs three things: shortening, flour, and milk. I chose Crisco, White Lily self rising flour, and buttermilk.


First step: measure f self-rising flour in a large bowl. Cut in shortening. I couldn't find my pastry cutter, so I used my hands to blend the Crisco into the flour. I stirred in a little more than 2/3 cup buttermilk. Stirring with a wooden spoon, I mixed until all dry ingredients were fully incorporated into the wet.
I squished all the dough into a large ball, flouring it a little more to keep it from sticking. 


I rolled it out about 1/2 inch thick and cut rounds out with a 2-inch biscuit cutter. These I placed on a baking sheet. I baked them for approximately 10 minutes until golden brown on bottom and top.  (See first picture for finished product)


This time I wanted biscuits for country ham. A few years ago when my husband and I went to Virginia to visit my grandparents, we went to the Smithfield Ham store around the corner from my Granny's apartment. We bought a pound; Grant ate half within minutes. It was his first taste of the almost unbearably salty, paper-thin slices of melt-in-your-mouth ham. I've been eating it since I could remember. I equate family holidays with hot biscuits nestling transparent shards of pink pork. The only thing I've altered is the condiment: instead of mayo, I prefer a tiny sliver of butter...but I digress. 

Over the holidays, my mother bought Grant a Smithfield ham. A whole one. Smithfield hams are salt and pepper crusted and cured for at least six months. They require one to scrub the mold off of the skin and soak the ham in cold water for at least 24 hours; hence it requires preparation, something in which I've never excelled. We lugged out the cooler and filled it with cold water. Grant scrubbed away and plunked in the ham.


Country ham is salty. It needs to be sliced--nay, shaved--to be able to be served in biscuits. With my trusty Wustoff Classic filet knife, I made quick work of the entire 15.56 pound monster. 
Buttermilk Biscuits
Makes 8-12 biscuits


2 cups self-rising flour
4 tablespoons shortening
a little more than 2/3 cup buttermilk


Preheat oven to 450 degrees. In a large bowl, cut shortening into flour either with your hands or a pastry cutter. With a wooden spoon, stir in buttermilk. Fully incorporate the dry ingredients into the wet. Form dough into a ball. On a floured surface, roll dough with a rolling pin approximately 1/2 inch thick. Cut into 2 inch rounds with a biscuit cutter. Bake on a cookie sheet for 8-12 minutes. 


Smithfield Ham
Feeds an army and a half


Follow the directions on the burlap sack in which it is packaged.


Tuesday, January 12, 2010

A Decent Omelet

It may be a urban legend, but word has it a famous French chef asks all of his potential sous chefs to prepare a omelette before he hires them. I've been making omelets for almost twenty years; however, I've made approximately twelve omelets that I'd willingly present to a renowned chef.  I don't claim to be an omelet master. My omelets are usually stuffed with goodies like goat cheese, a pork product, and some vegetables (if truly necessary). If one belongs to the less is more camp you can never go wrong with a good sharp cheddar and some freshly cracked pepper. 

That said, I do have a formula that works for me. I start with a 10-inch, heavy nonstick pan and heat it over medium heat. French chefs, who often don't care about their hearts, use butter. I use PAM.


After whisking the two eggs in a cup, I pour them in the skillet, twisting it to cover the entire surface.


After about a minute and a half over medium high heat, the eggs will be set enough to fill. I used chopped grape tomatoes and plain goat cheese. I sprinkled them on the left half of the omelet. A twist of salt and pepper would be welcome at this stage, too.


Now comes the fun part. Using a spatula, I loosened the edges and flipped the other half over the filling.


Slide it onto a plate and voila!